Pages

Friday, October 27, 2023

Dazzling Diamonds - Part 2 - Embroidery Transfer

Today we will continue our Dazzling Diamonds Sew-A-Long adventure!

Hopefully, you have pieced most of the blocks this past week. Now, we are ready to embroider the seam lines. The specific embroidery stitches used are described in the book (pages 22-27). There will be some Silk Ribbon Embroidery (SRE) elements on many of these seams, but that instruction will be in our post on November 3rd. Today, we will concentrate only on the fiber embroidery elements.

Each seam begins with a BASE embroidery section. This is then enhanced with additional elements of fiber embroidery and/or silk ribbon embroidery as well as beads/sequins. To begin, we need a pieced block and the base embroidery design.


Then, we need to transfer the base embroidery design directly to our pieced fabric block. There are multiple ways to accomplish this:

1) Free-hand draw the design on to the block.

2) Trace the design to thin paper (like tissue paper), overlay that to the fabric block then for stitching through.

3) Print the overlay directly to sheets of thin paper (like tracing paper), overlay that to the fabric block and stitch through.

4) Print the overlay embroidery designs directly to printable water soluble paper sheets. (This is the method described in the book)

FHere is a link to download the Overlay Embroidery Designs for the blocks. Print and use one of the four methods of transfer above to place the embroidery guides on to your pieced blocks. Use the book to guide your actual embroidery to complete these BASE seams.

 Embroider Design Overlay

All of the above methods of transfer have pros/cons. Other than (a) you will be removing paper or water soluble paper after completing the basic embroidery. If you choose the water-soluble method, steps are included in the book on page 19. Removing water soluble requires the application of water to dissolve the soluble material. This is best done under a running tap of water, with the embroidered block facing down. As the water-soluble material softens it can be gently scrubbed with your fingers (underneath the block, directly on the embroidery, as water continues to run through the fabric block).

Wet blocks will then need to be pressed dry. If you did not pre-wash your fabrics, then the cotton fabric block will shrink slightly. That is fine, as each design included an extra seam allowance measurement for this purpose.

I’ll post photos of the water-soluble steps discussed above on my blog (shawkl.com) as I work on Block #11. So, if you need more information on on the how-to portion, jump over there tomorrow.

Tuesday, October 24, 2023

Piecing Block #11

Thought you might like some more photos. So, here is my piecing of Block #11.

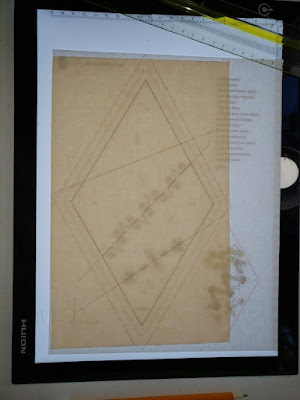
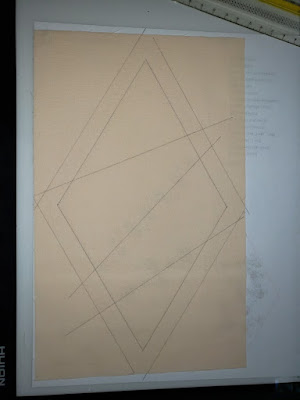
First, I used my light table to trace the major portions of the block to my foundation fabric.

Here is what that looks like if I turn off the light table. This is what you should be seeing when you trace your blocks as well. REMEMBER to flip-over your pattern page so you are tracing the reverse image....since we are tracing on the back of our foundation fabric.


Next we need out fabric patches to sew to this foundation layer. Page 17 of Dazzling Diamonds explains this approach in more details.


Beginning at the center of the block, on the foundation...I place the first fabric down. Next, I flip the next patch over that and sew along the seam. The fabrics go on the front of the fabric...NOT on the side where you have the lines drawn; so use the light table to help you see these alignments better (or draw lines on both fabric sides).


Continue placing parts until the full block has been assembled. Now you are ready to place the embroidery overlay on top of the block. We will cover this in our Part #3 post on 27 October.


Monday, October 23, 2023

Organization Continues - Block Construction Beginning


I have printed out the Block Design sheets (use the link in the book, see page 16 in the book, under Block Construction heading.

Using the crayon colored page shown in the previous post...I transferred all of the Fabric Palette color references (ALPHA) to each page (block) of design sheets. Here in Block #1 you can see (above) that I will be using the fabrics A, K, H, and B for this block construction.

My next preparation task is to take my Foundation Fabric and cut out a rectangle large enough to hold the TRIANGLE block size. For me, I cut up some cotton in a light color...27 blocks...measuring about 6 1/2" x 10 1/2" to hold the full block dimensions. Now, I will use my light box to trace each block diagram using a #2 lead pencil. I will trace the inside and outside shape lines lines (1 solid, 1 red dot) on to the fabric. Then, I will trace the red dashed lines that mark the Fabric  Seam Line (see where the pencil point above it indicating) on to the foundation fabric block outline.

These lines will help you to place your fabric; and can provide a sewing line for you to "flip'n'sew" your block". You can use individual pattern pieces if you cut your printed pages along the seam lines (shown in the book). Or, you can use the drawn lines and wide stripes of fabric (I'll be cutting one strip of 4.5 inchs wide from each fabric) to more quickly piece these blocks. Where an area is larger than 4.5", I will have to cut a new piece of fabric to cover. Where an area is less than 4.5"...well, I will have wasted some fabric in favor of quickness.

IMPORTANT NOTE: If you choose to trace the block outline as described above...remember to flip-over the pattern page so that you are copying the REVERSE of the block design since you will be working from the back of the foundation fabric to piece the block on it's front.


Block #1 - Here you will see that I've flipped the paper page over on my light table. I traced (using a ruler) the solid black TRIANGLE shape and the most outer (red dashed line) triangle shape. Then I've added the inside seam lines (red dashed lines).


Here is what the traced lines look like, after I have turned off the light box. I will also add the "Letter" of the fabric piece to each patch to help me remember...and hopefully, speed up the addition of the color fabric patches to the front of this Foundation Fabric. Remember than the pencil lines are on the back side...which is why I reversed the paper page pattern on my light box.

Sunday, October 22, 2023

My Fabric Palette & Design Plan


Here is a photo of my fabrics, pasted to my Palette Guide. You might also note a small "color smidge" next to each fabric block...that is the crayon color used to represent that specific fabric in my Layout coloring page.


Here is my color layout page. I developed it by first considering the number of different fabrics planned to be used in the quilt (16 for me) and then dividing the possible patches in the quilt (100 by the way) to find that I should try to use each fabric color (6 is my number).

So, I began with a single color and tried to use it six times across the quilt; never letting that color "touch" itself as I selected the patches for it. I also tried to balance the color by spreading it across the quilt as much as possible.

While the embroidery will be the STAR of this project; it is important to still have a nice combination and balance of color in the placement of fabrics.


Friday, October 20, 2023

Dazzling Diamonds Sew-A-Long: Part 1

Welcome to Part 1 of the Dazzling Diamonds Sew-A-Long! Read below for instructions on starting off the Dazzling Diamonds Quilt.

All page references in this post refer to your ebook or physical copy of Crazy Quilting Dazzling Diamonds.

Organization

Create a fabric swatch guide (include your representative color pencil color too). (Click link below for free pdf download.)

Fabric Swatch Guide

Use colored pencils and the piecing diagram (page 13) to ensure a good color balance in fabrics across the project. (Click link below for free pdf download.)

Piecing Diagram

Print the block patterns (refer to page 16 for the URL link to the pattern). Cut each individual block pattern into patches, label each with the fabric color you will be using. 

Cutting

Lay each individual patch pattern on the correct fabric (refer to page 14). Cut each fabric patch out, being careful to add seam allowance along the cut pattern lines (refer to page 17). Stack the patches together into their respective block; label and set aside.

You can choose to cut the borders now or wait until Part #3 of the Sew-A-Long. You can also omit any borders if you desire. These will not be embellished. Borders will be 6” cut by Width of Fabric (WOF).

Fabric Choices:

Most traditional crazy quilts are made of velvet, silk, brocade, and satin fabrics. However, these are all very expensive…especially when we are in the “learning stages” or creating crazy quilts. So, modern quilts often are made of cotton fabrics. Blenders and solids rather than busy prints will ensure your embroidery work is the focal of the quilt. That doesn’t mean that the fabrics need to be “plain”…just not super busy. Batiks make a great alternative to fancy fabrics. Using beautiful cottons in saturated colors can create drama.

The instruction quilt is created in some gorgeous fall colors; but your colors can be any combination you desire. 


Strive for “harmony” rather than “drama” when selecting your fabric colors. The drama will be added in the gorgeous fiber and silk ribbon embroidery!

Foundation: Crazy quilts are built on a foundation layer because the embroidery and beads create too much weight for a single layer of fabric. Also, this foundation will give you a place to “hide” all of your embroidery fiber traveling and bead thread knots.

Cut seven strips measuring 8” by WOF; subcut these into 27 pieces measuring 8” x 10”. Muslin or cream/white cotton will work beautifully as a foundation. If fabric is not available, you can also use a lightweight interfacing as your foundation. (If you plan on doing heavy embellishing, a combination of fabric/foundation is a good solution.)

Instructions

Use a standard quarter-inch seam allowance when piecing the individual blocks. These blocks are assembled as you would a normal traditional pieced block. Follow the block diagrams and your fabric color placement guide lay out each patch in the proper place (refer to page 17) to create the specific block. All piecing should be done on top of the foundation fabric layer.  Begin with a center patch…then simply “flip’n’sew” the adjacent patches into place. Press the blocks and set aside.

Return here or to the C&T Blog for Part 2, which will be posted on Friday, October 27.

For more information on the Dazzling Diamonds Sew-A-Long, including the supply list and schedule, visit the first Dazzling Diamonds Sew-A-Long blog post:  http://www.shawkl.com/2023/10/dazzling-diamonds-sew-long-everything.html

Happy stitching!

Wednesday, October 11, 2023

Dazzling Diamonds Sew-A-Long: Everything you need to know


“Have you ever wanted to create a crazy quilt, but were worried over how to start? Well, that’s exactly why I wrote Dazzling Diamonds. The intent was to give readers a full instruction book, using modern techniques, to enable them to create a crazy quilt from start-to-finish. I purposely used cotton fabrics because quilters and seamstress/tailors already were familiar with that type of fabric. I also made the decision to keep the project small so it was manageable in size so to not become too over-whelming. This is what I call a “planned project” because the quilt is totally designed for you. The layout, the individual embellishing design, and the specific embroidery stitches have all been provided to ensure a balanced final project. Success is practically guaranteed if you just follow the path laid out before you. The Sew-A-Long will also give you a venue to ask questions (just post a comment here on my blog).

Silks, satins, velvets make gorgeous quilts. But, they are not easy fabrics to work with, especially when you are at the basic stage of creating a crazy quilt. Plus, these fancy fabrics can be very expensive to source. We don’t want to waste our precious fancy fabrics as we learn the principles needed to create this multi-faceted quilt. Rather, let’s make sure to guarantee our success by using good quality cotton.

These blocks will be packed full of beautiful embroidery work, silk ribbon flowers, and beads/baubles. This gives the reader the full spectrum of techniques they will need to learn. The end result is a beautiful wall hanging. PLUS you will have gained the confidence to try a larger quilt…which could also incorporate those lush velvets, satins, silks and brocades we all dream about when thinking of traditional crazy quilts.

Cotton does not have to be boring! So, don’t be concerned that we are not using velvets or silks. This is after all, a “learning” endeavor. Plus, there are some gorgeous batiks and cotton tone-on-tone blenders on the market today. We will be using a wonderful set of rich autumn colors in the sample quilt for this Sew-A-Long. But, you can select the palette of your own desire…maybe a spring color set (like the book cover shows); or go with a lovely monochromatic grouping even. If you would like to use the same fabrics as I’ll be using…then hop on over to Connecting Threads (details below).”


How the Sew-A-Long Works

The Crazy Quilting Dazzling Diamonds will be released in 3 main parts and will be available on the C&T Blog as well as my personal blog following the schedule below. With each part, you will receive instructions to follow along as I recreate the Dazzling Diamonds Quilt from my book, Crazy Quilting Dazzling Diamonds. I will show you my progress and give you helpful tips and tricks in each part. There will be also be additional blog posts here on my blog; just to provide individual close-up photos and give you extra information as the Sew-A-Long progresses. While the book will be the path for this quilt, I will also share different piecing options and design principles you would need when venturing into a quilt that is not already “planned out” for you.

 Schedule

Tuesday, October 10: Dazzling Diamonds Sew-A-Long announcement (You are here!)(I'm a day late however)

Friday, October 20: Part 1- Organization, Design Principles, Piecing the Blocks

Friday, October 27: Part 2- Embroidery Design Transfer, Base Seams

Friday, November 3: Part 3-Silk Ribbon Flowers, Beads & Baubles, Finishing

What you’ll need

 Here are the links to the exact fabric that I will be using in the Sew-A-Long:

Autumn Sunset Batiks Fat Quarter Sampler | ConnectingThreads.com

Agate Batik | ConnectingThreads.com

Labyrinth Batik | ConnectingThreads.com


To get you prepared for the Dazzling Diamonds Sew-A-Long, here is a list of materials and project notes. In addition to standard sewing and quilt-making supplies, you’ll need:


A physical or ebook copy of Crazy Quilting Dazzling Diamonds.


SUPPLIES:

Fabrics

Variety of small prints, solids, and nondirectional blenders in light/medium values:

1/4 yard or fat eighth each for blocks

Border fabric: 3/4 yard of medium-weight cotton upholstery fabric

Foundation fabric: 2 yards of neutral-color cotton broadcloth or good-quality muslin

Backing and hanging sleeve: 11/8 yards

 Other Materials

Water-soluble printable stitch stabilizer sheets or Embroidery Shape Templates (See Online Resources, page 94.)

Template plastic

Perle cotton: Size 8 in a variety of colors or 3-ply six strand embroidery fibers

Silk ribbon: Sizes 2 mm, 4 mm, 7 mm, and 13 mm in assorted flower and leaf colors (sizes can be adjusted but 4mm & 7mm is critical)

Seed beads: Size 11 (standard) (can also use size 15/20)

Round beads: Sizes 2 mm, 3 mm, and 4 mm in glass, crystal, or plastic as you like

Crystal montées: Sizes 3 mm and 4 mm or small

Sequins: Sizes 4 mm, 6 mm, 8 mm, and 10 mm

Floral beads caps: Sizes 6 mm–10 mm

Flat 2-hole and 4-hole buttons: 1/4 ̋–1/2 ̋ in diameter

Note: The selection of fibers, beads & baubles are personal and will depend on your own stash and the color you choose. All of the above types can be substituted with any other “bauble” you like, just keep to the same general size to ensure the final result remains balanced. Half the fun of embellishing is getting to use that “favorite” bead, sequin, button or jewelry finding!

 Connect with us!

 Follow C&T’s Facebook and Instagram pages for weekly reminders! You are invited to share your progress by tagging @ctpublishing and using #DazzlingDiamondsSewALong. But, if you have any questions, reach out to me here on my blog as I'm always happy to answer any questions you might have.